 Sign up below to receive weekly tips & tools for homeschool science and we'll send you a FREE copy of
  One of the few experiments I remember doing in high school was t-shirt chromatography.
I can still picture the coffee cans and sharpies all lined up and ready to go in my mind. We spend the whole class period making the shirts and I wore mine until it faded and basically fell apart.
So today, I’m going to do you a favor. I’m going to share just how to do this activity with your students.
I promise you will look like a rock star in their eyes. They will thank you profusely – that is if they can stop doing this for long enough to do so.
But before I share the secret with you, I want to share a bit about the science behind chromatography with you so that you can pass it along to your students.
What is Chromatography?
Chromatography is:
A method of separating the substances in a mixture by the rate they move through or along a medium.
Which is just a fancy way of saying that chromatography is a way of separating substances along some type of filter material, like a t-shirt or a coffee filter.
Scientists use a solvent, which will dissolves all the molecules in a mixture. For this method to work, the molecules in the mixture need to be different sizes. This is so that the solvent can carry the molecules along the filter material at different rates.
Basically, the smaller the molecule is, the farther a solvent will carry it. In this way, chromatography can separate the molecules in a mixture according to their size.
Additional Vocabulary
- Molecule– A substance which is made up of two or more elements that are chemically bonded.
- Mixture – A combination of two or more elements or compounds that are not chemically combined.
- Solvent – The substance in which the solute dissolves to form a solution, typically a liquid.
T-shirt Chromatography Activity
 Materials
- White t-shirt
- Isopropyl Alcohol (80% or above)
- Eyedropper
- Coffee can (or a wide-mouthed jar or bowl)
- Rubber band
- Permanent markers in a variety of colors
- Newspaper
Procedure
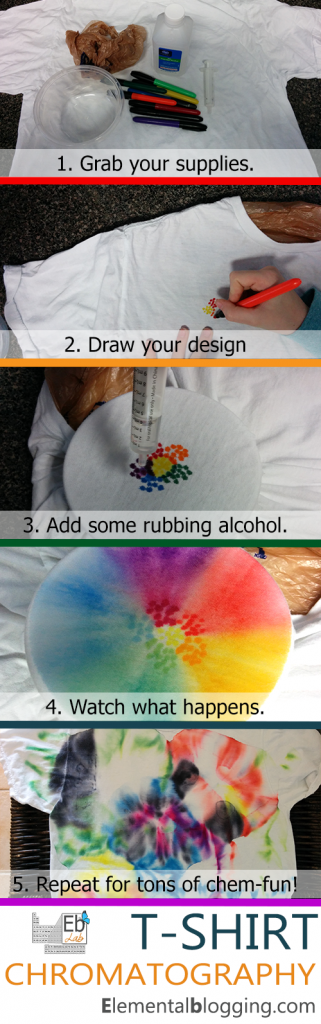
- Lay a few newspaper down on your work surface. Now, have the students create a design with different colored dots. Their design should stay within a 2 to 3 in radius as the design will spread out quite a bit.
- Next, place the part of the design over the center of the coffee can and secure it will rubber bands.
- Then, use the eye dropper to drop several drops of the alcohol in the center of the design and watch what happens! If the spreading out stops before the end of the can is reached, add a few more drops of alcohol. (Note – You will want to do this step in a well-ventilated area.)
- Repeat over and over again until the t-shirt is full of your students’ designs.
- Let it dry overnight, put the t-shirt on, and wear your experiment for everyone to see! (Note – You can soak the t-shirt in saltwater to help set the colors.)
Results and Explanation
The students should see that as the alcohol spreads out, it picks up part of the ink and spreads it out – creating a beautiful design. Markers are made up of several different types of ink, which is soluble in isopropyl alcohol.
The alcohol picks up the molecules of ink and carries them along the filter paper. Some of these ink molecules are heavier than the others. So, it separates the ink into different colors by depositing the heavier molecules sooner than the lighter ones.
Take it Further
If you have older students, you may want to try this experiment again using a coffee filter. This time have them compare the difference between using water and alcohol as solvents. Did the colors separate in the same way? Did they travel the same distances?
You could also try different brands of markers to see if the results are different than the ones you originally used.
More Chromatography Fun
Here’s a few more activities that use chromatography:
- Chromatography Butterflies from Bug and Buddy
- Chromatography Bags from Babble Dabble Do
- Leaf Chromatography from Teach Beside Me
I trust that you and your students will have a blast with this project! Don’t hesitate to leave me any questions you have in the comments below.
What a great spin on the chromatography lesson! I’ve done this so many times with coffee filters, markers or leaves. This a great way to change it up! Thanks!
Your welcome, Sarah!
We did this today and they loved it. Thanks!
Great – thank you so much for stopping back to let me know!